
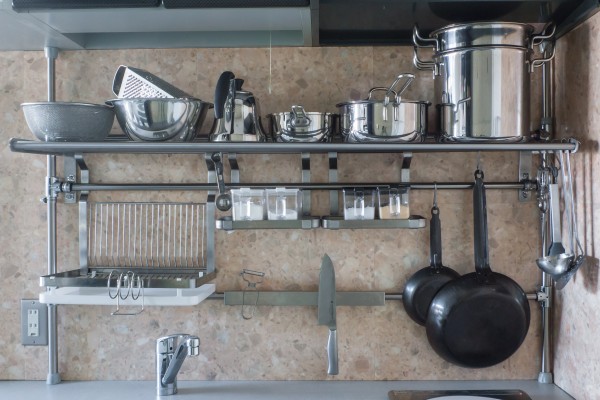
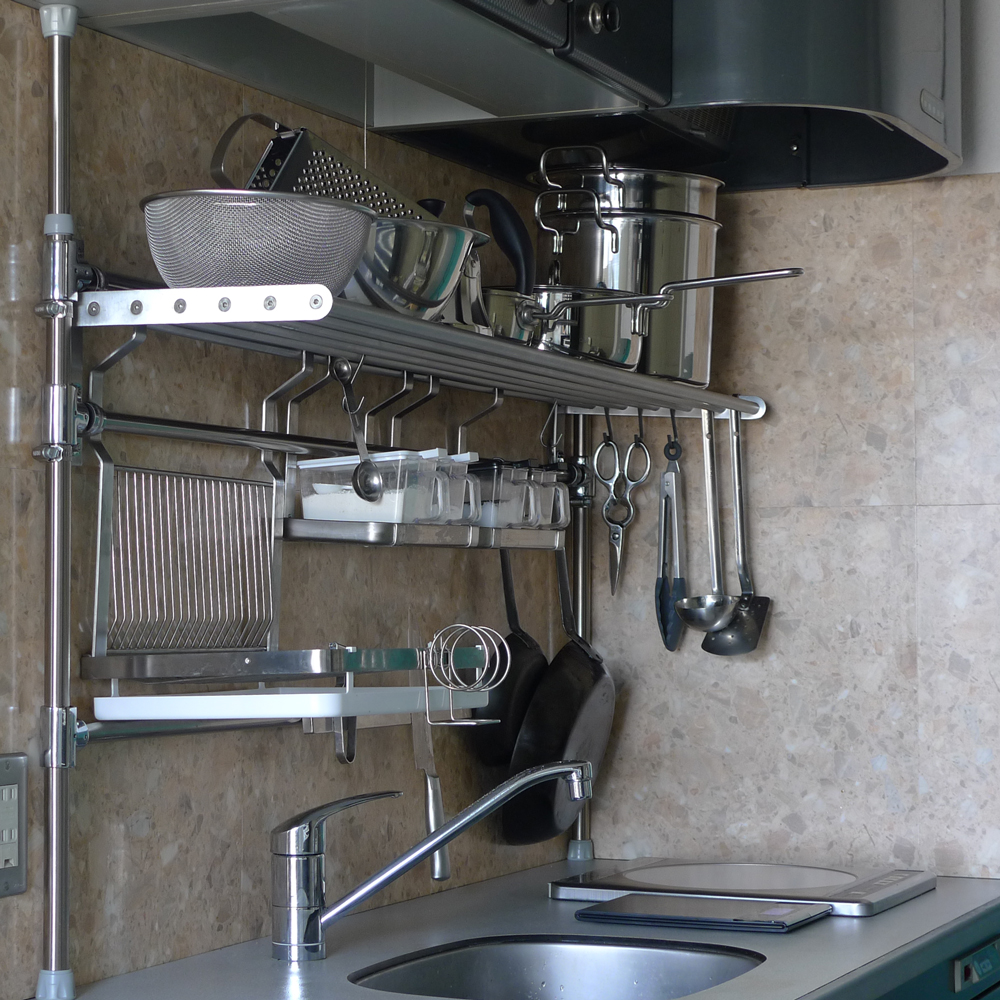
The GRUNDTAL kitchen series creates a stylish kitchen by hanging a variety of shelf parts that are secured to the wall. Image searching “GRUNDTAL” produces images of the epitome of a stylish kitchen. But, it requires a durable wall for installation. In addition, you may face the problem of not being able to drill holes in a rented space. So, I have tried attaching it with a tension rod to avoid drilling into the wall.

The following is a list of the materials you will need. The boxed products are Ikea. The hardware and stainless steel pipe I purchased by mail order or home center.
| Name | Specification | Quantity |
|---|---|---|
| GRUNDTAL Wall shelf – 120 cm – IKEA |
width: 120cm | 1 |
| GRUNDTAL Dish drainer – IKEA |
Length: 35 cm Width: 26 cm Height: 37 cm | 1 |
| GRUNDTAL Shelf – IKEA |
Width: 25 cm depth: 13 cm Height: 20 cm | 2 |
| GRUNDTAL Magnetic knife rack – IKEA |
Width: 40cm | 1 | Stainless tension rod | 70~110cm Outer diameter1:22mm Outer diameter2:19mm | 2 |
| Stainless steel pipe | Outer diameter:19mm Length:1210mm | 3 |
| Chrome T pipe connector | Nominal diameter: 25mm | 6 |
| Stain less hose clamp | Usage range: 11~25mm | 6 |
| Resin Bush | Outer diameter: 25mm Inner diameter: 22mm Length: 30mm | 6 |
| Resin Bush | Outer diameter: 23mm Inner diameter: 20mm Length: 25mm | 4 |
| Stainless wire rope | Rope diameter:1.5mm | 3.0(m) |
| Stainless saddle band | Nominal diameter:20 | 4 |
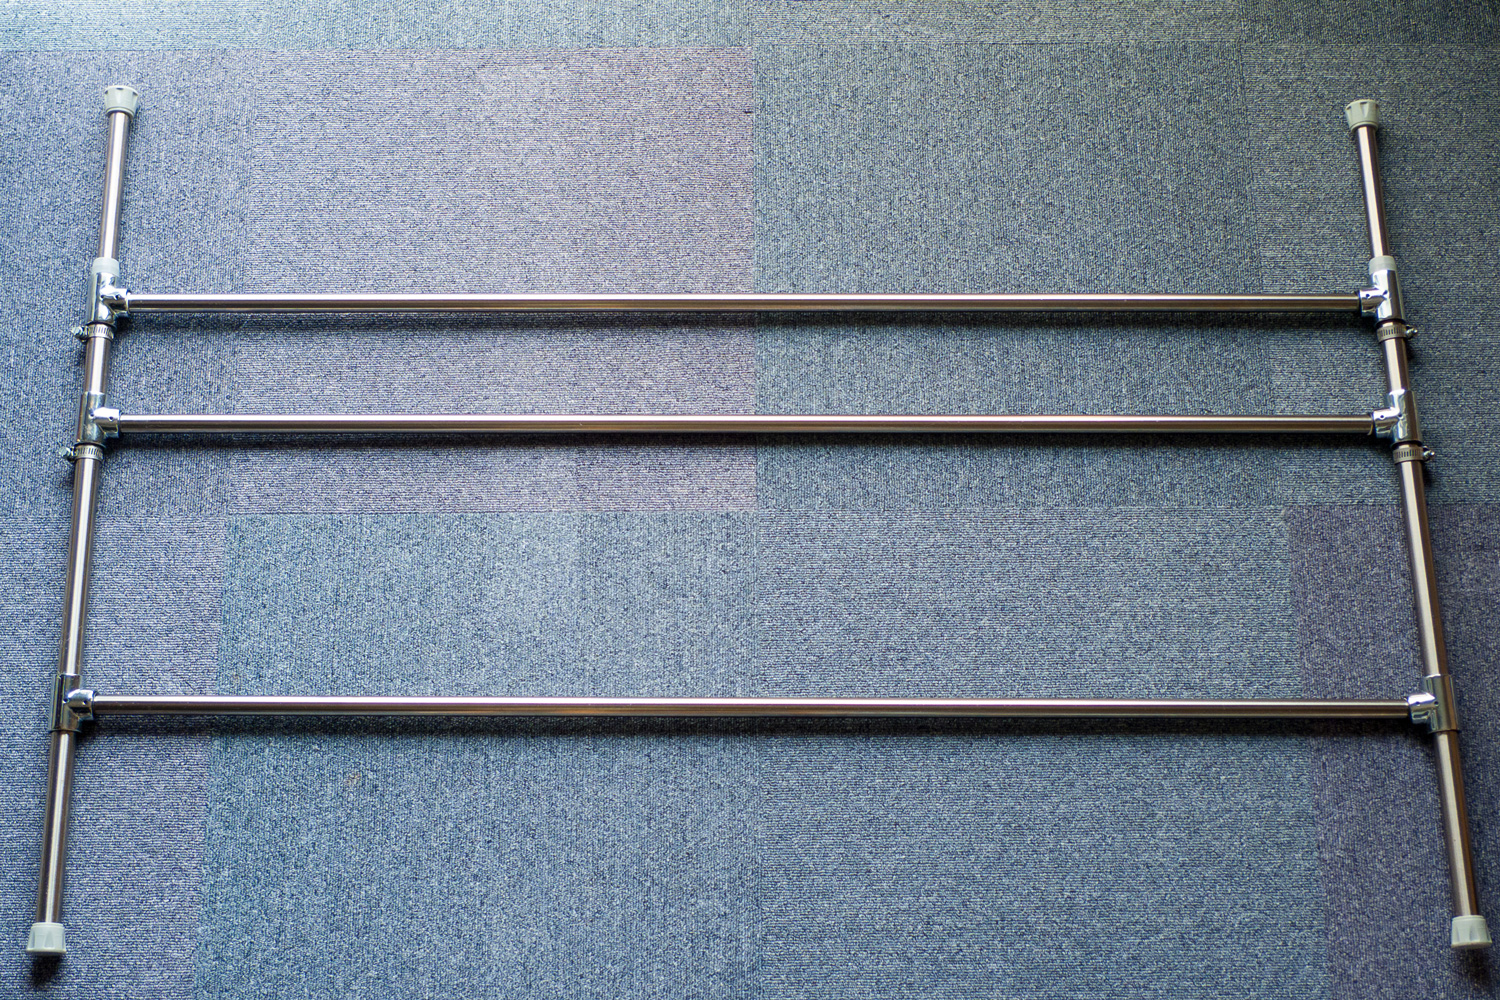
Set to bridge with three stainless steel pipe, between two vertical stainless tension rods. The part of the T-shape is connected by a T pipe connector.
Secure the hose clamp on the lower side so it does not move.
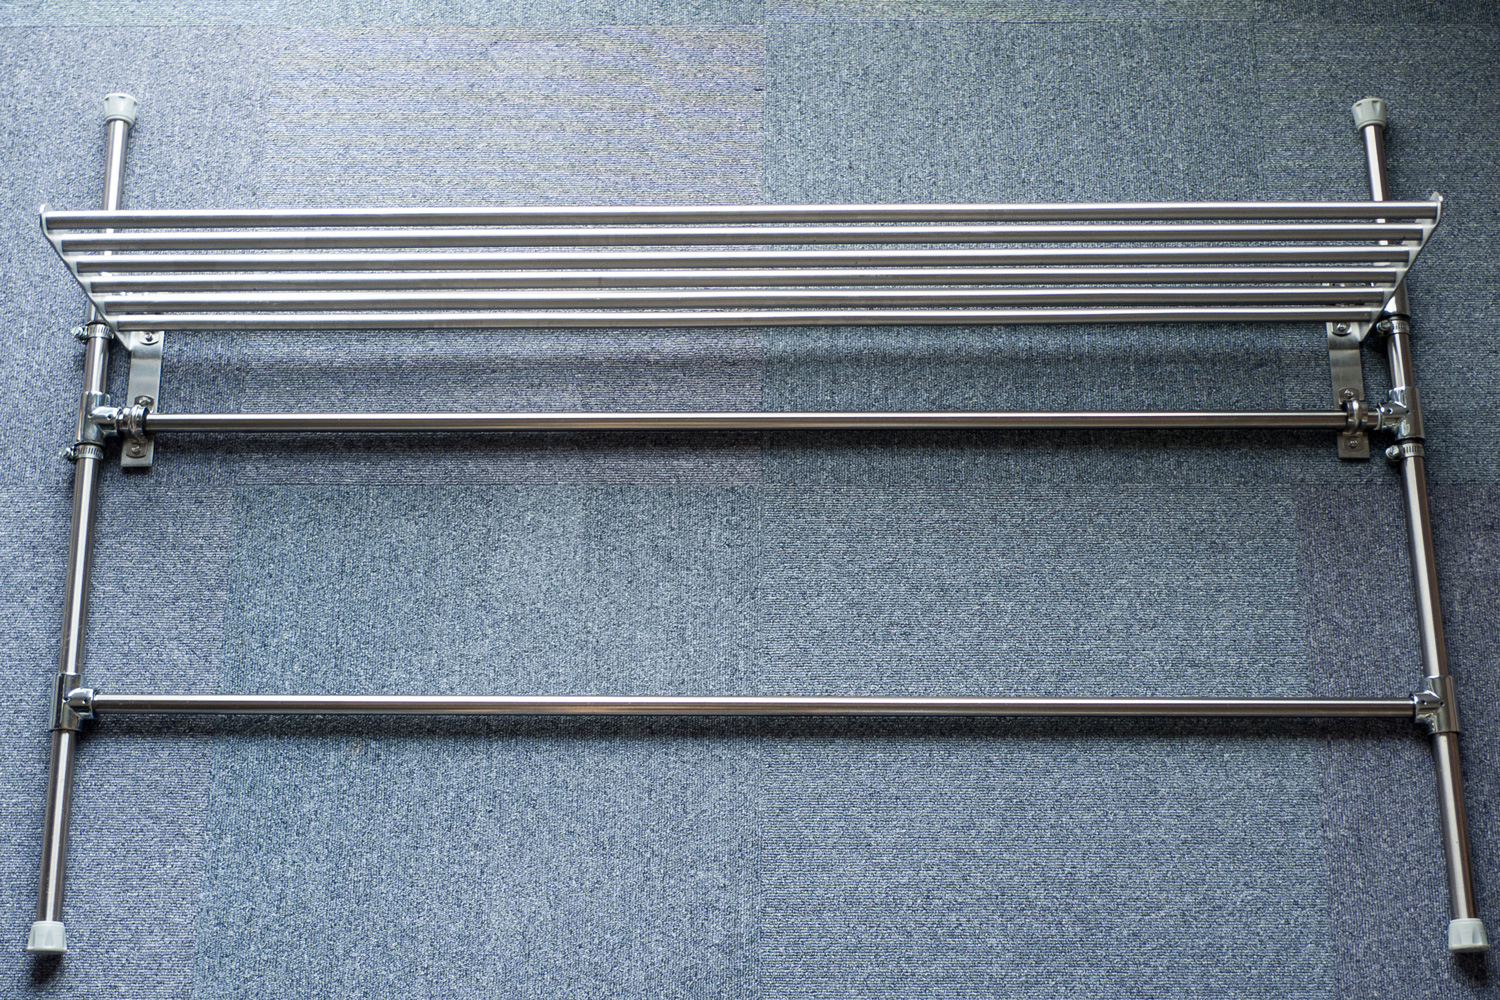
Attach the GRUNDTAL wall shelf to the stainless steel pipe with the saddle bands.
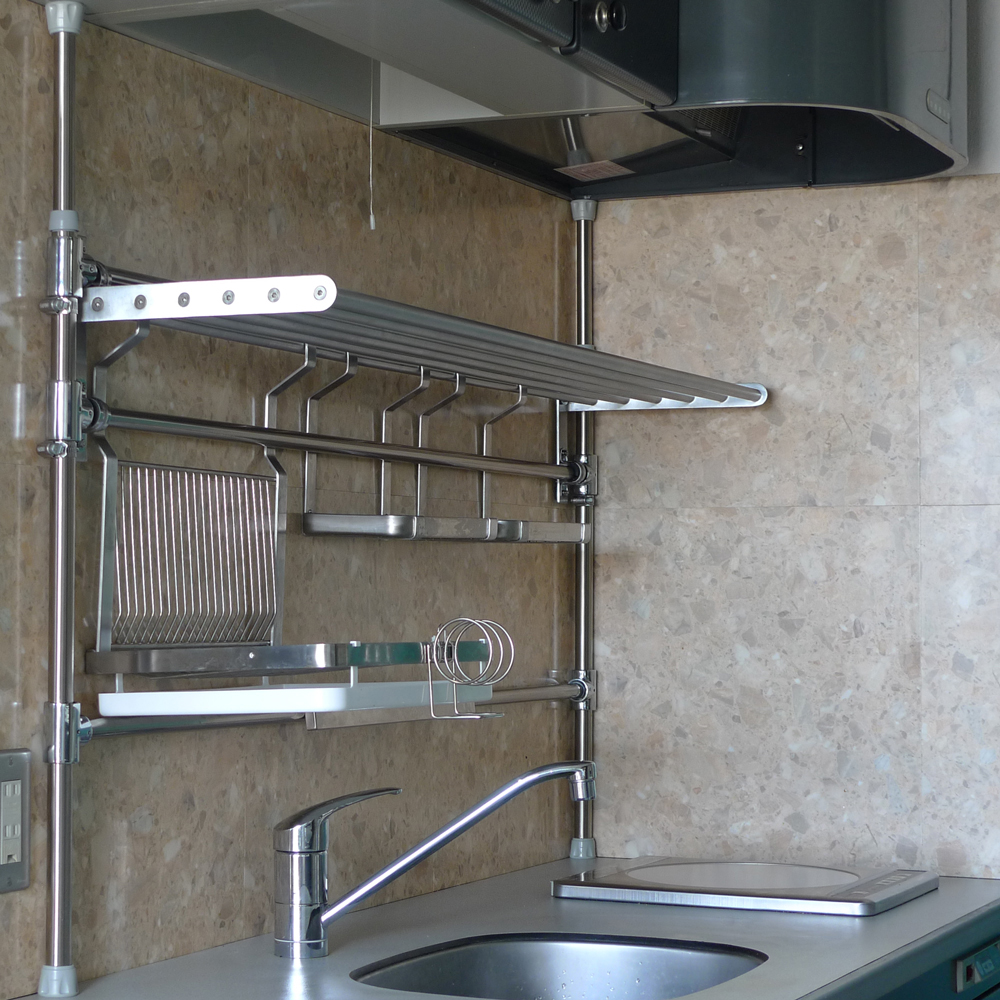
Attach it by securing the tension rod between the cupboard and the top plate of the kitchen.

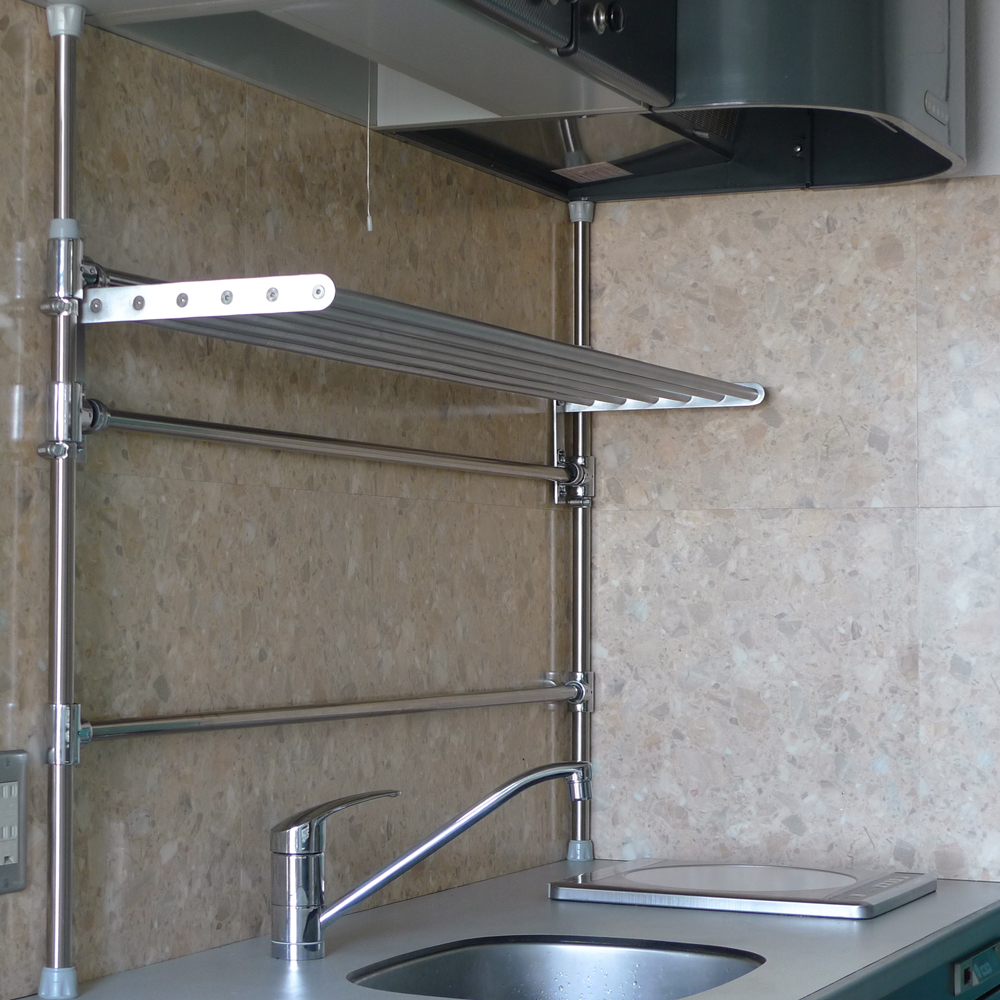
This is a part of the mounting shelf. You’ll notice that the wall shelf is supported by the stainless steel pipe.
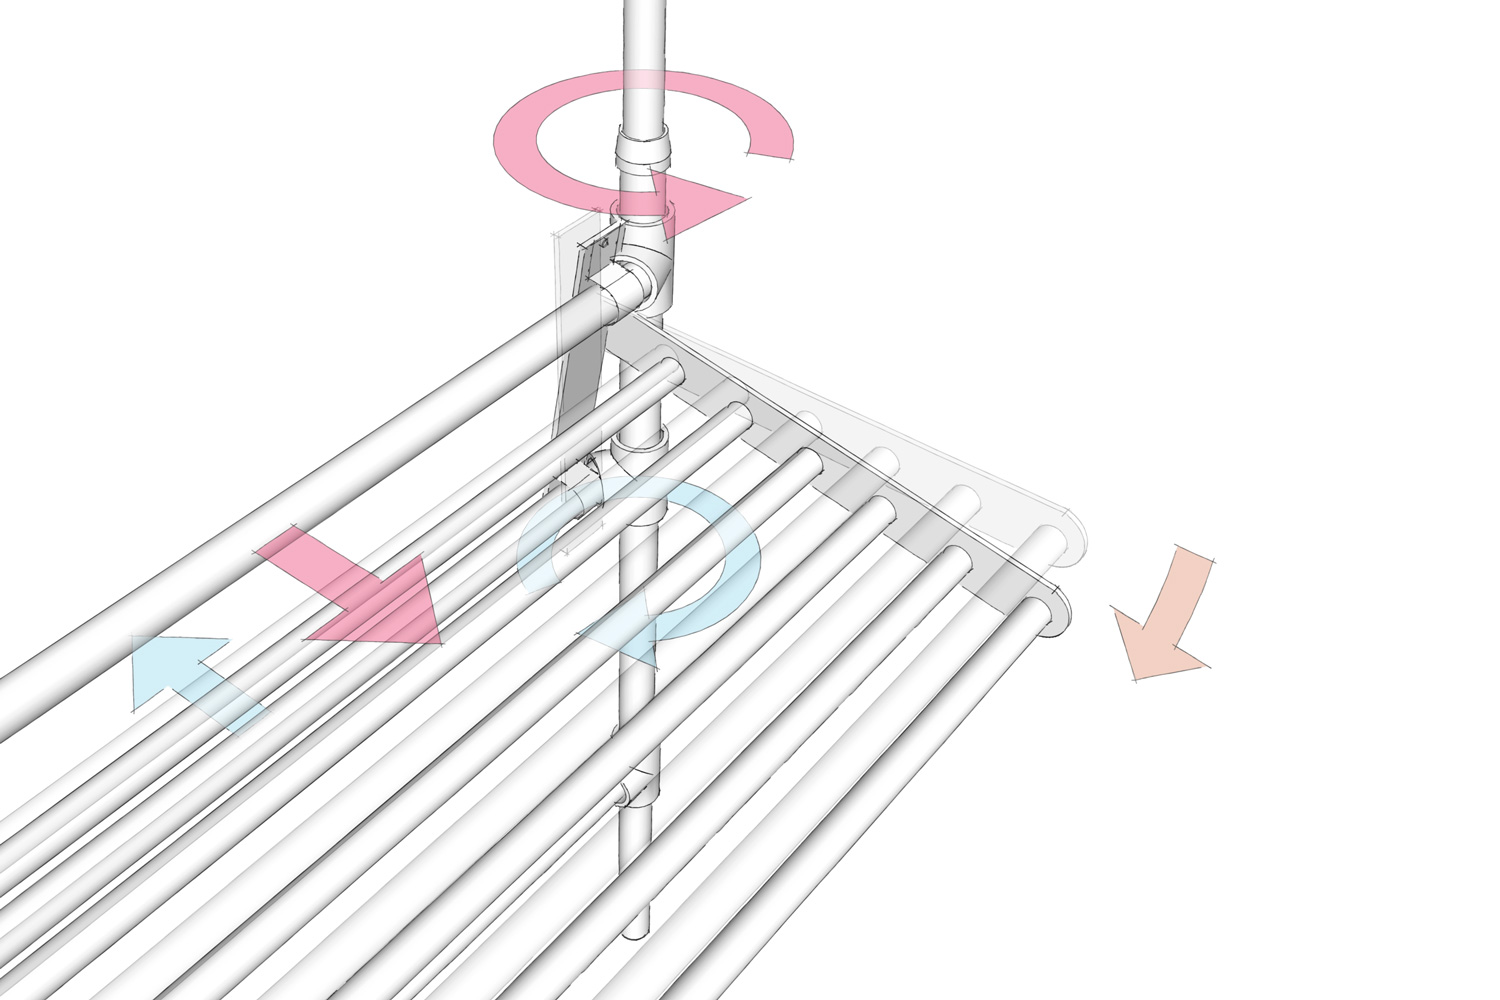
I have used this for about 5 months and the tension rod is stable. But like in the following image, if the T pipe connector can move in the direction of the rod’s rotation, the horizontal stainless steel pipe will move and the wall shelf will lean to the front, so be careful.
3d data of Grundtal shelf is here.
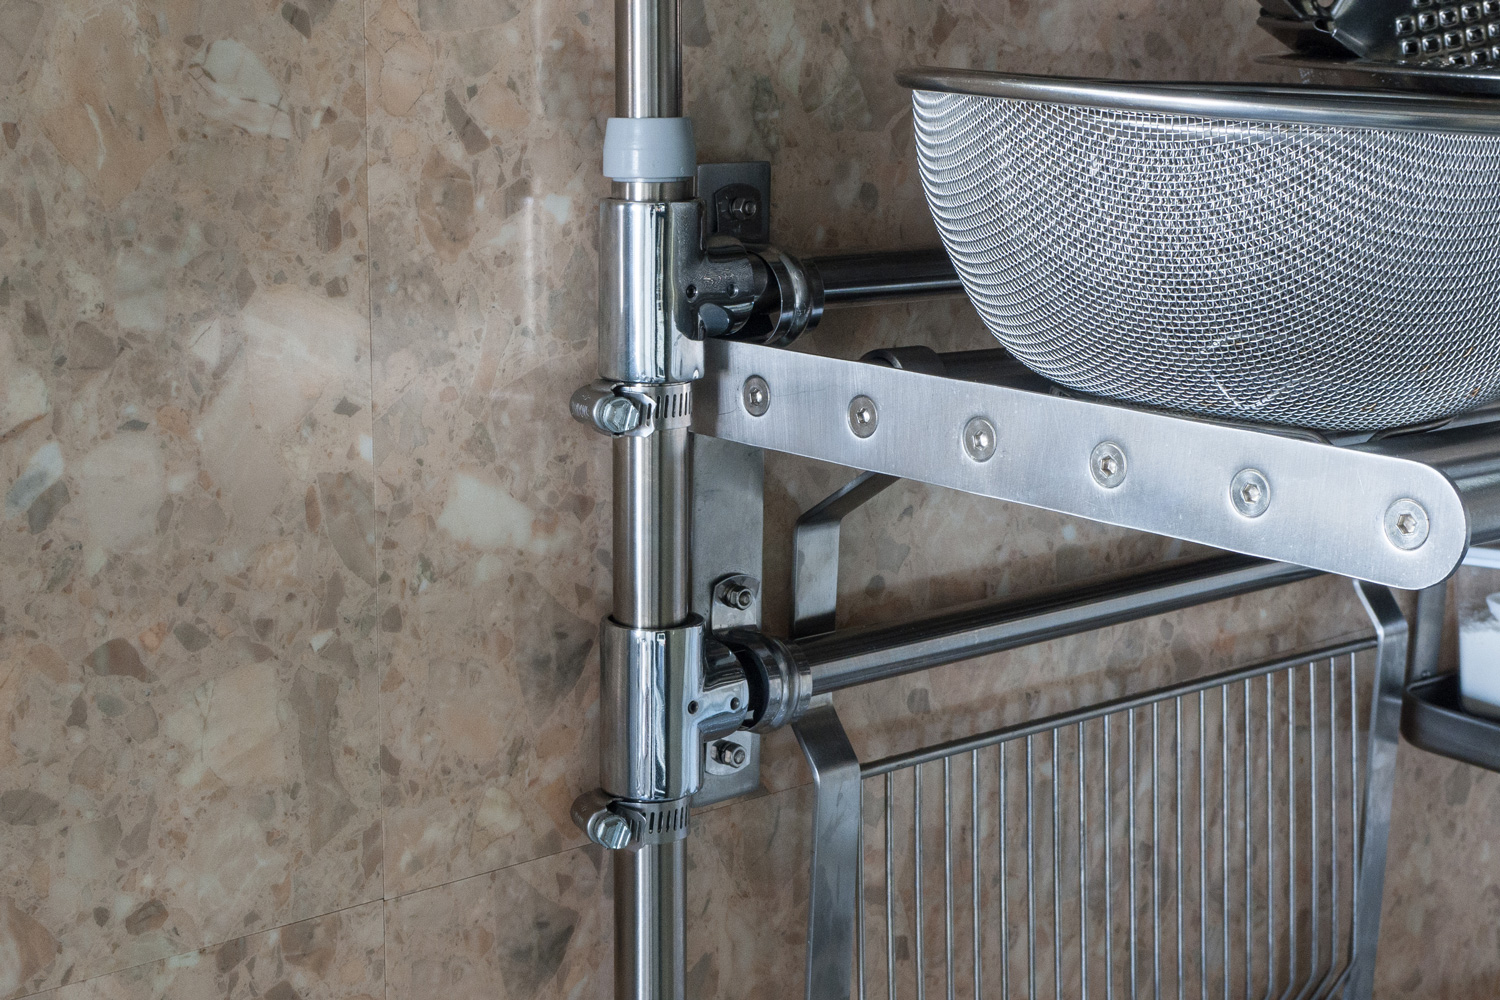
Details of the joint portion of the T-shaped connector
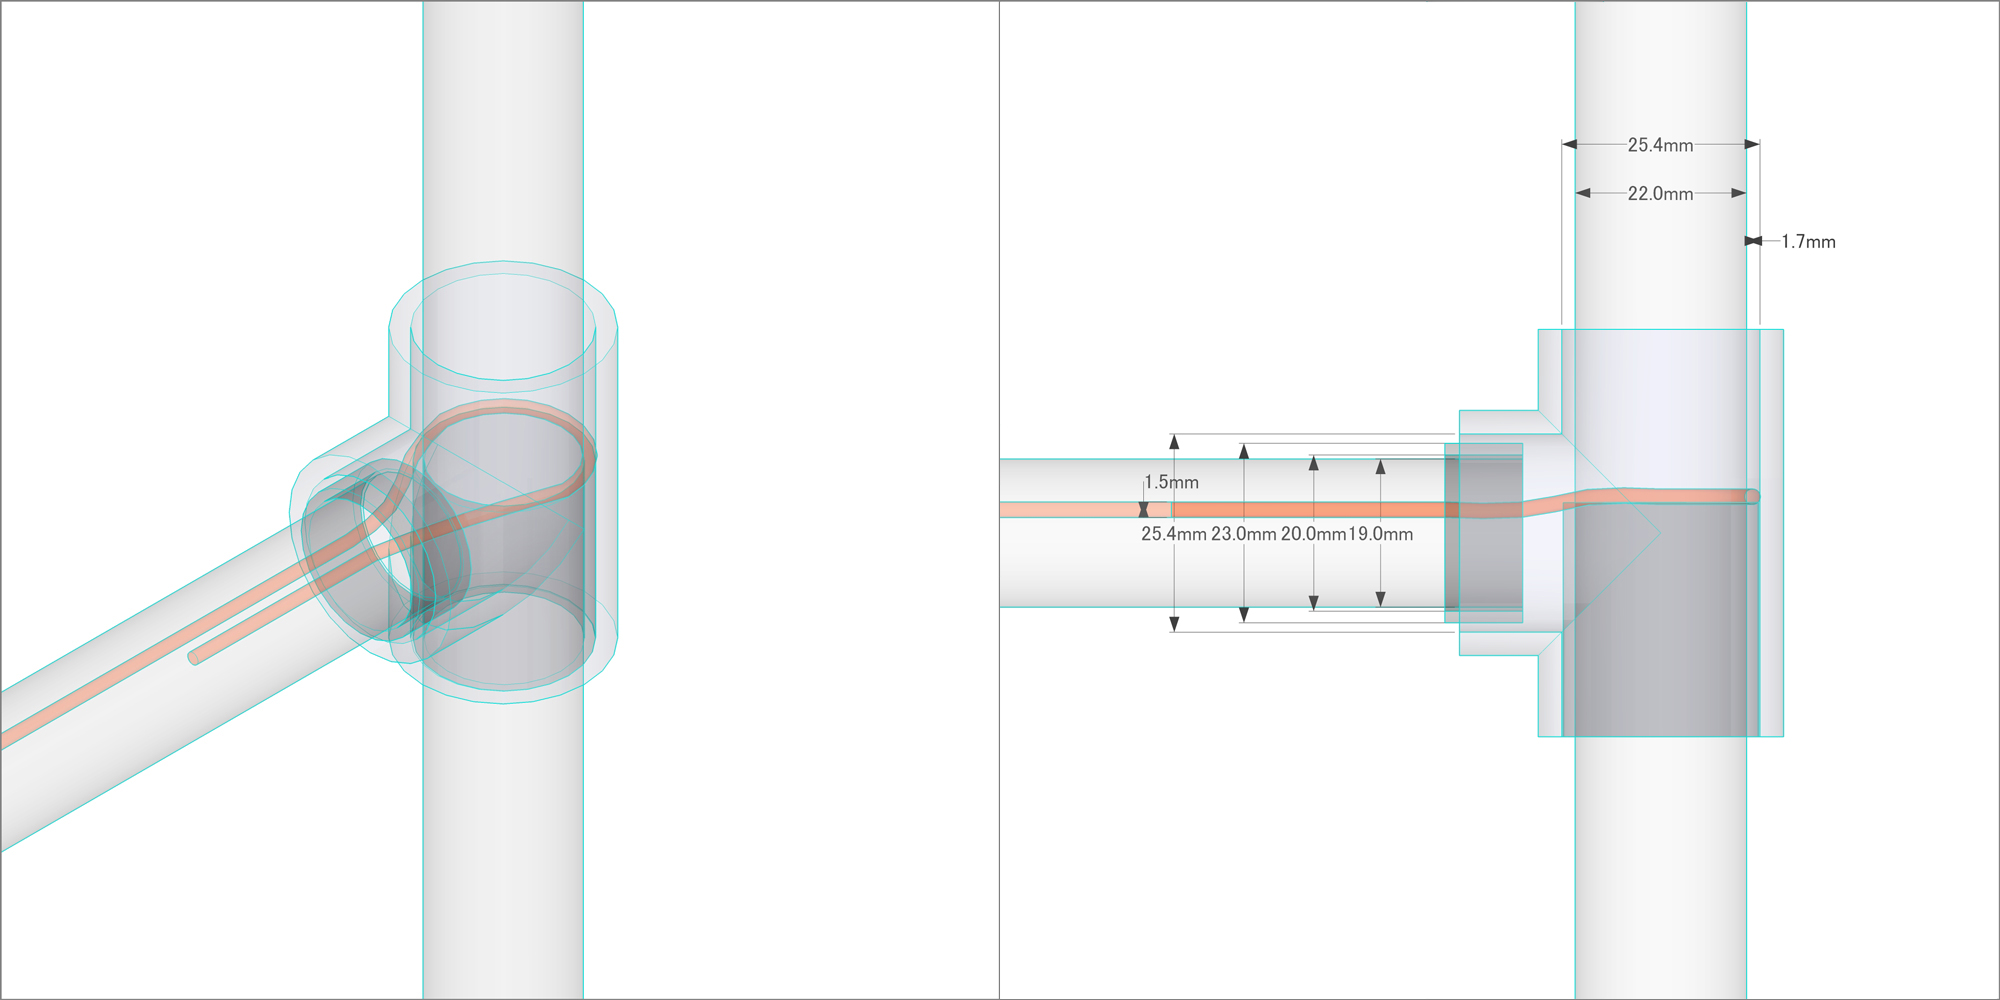
The inner diameter of the T pipe connector is 25mm, the outer diameter of the stainless steel pipe is 19mm, the tension rod is 22mm, so I tried to adjust these gaps caused by the pipe (Bush) using resin. Pass a wire into the stainless steel pipe horizontally, and hook the wire to the tension rod to fix it horizontally. (So that it doesn’t come out of the steel pipe.)
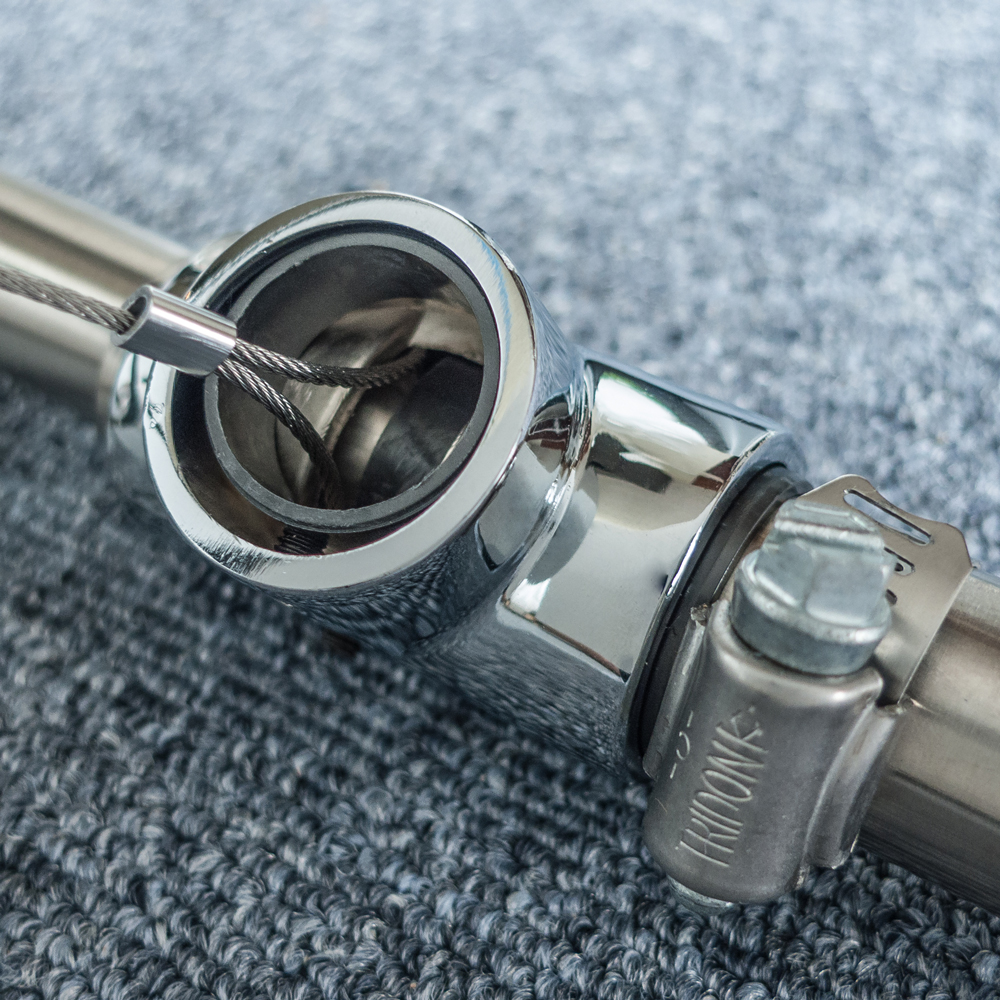

First, secure it with the wire as in the picture on the left. Adjust the length of the wire to the length of stainless steel pipe. Pass the wire through the stainless steel pipe. Then make a hoop, insert the stainless steel pipe into T pipe connector, and pass the stainless tension rod through this hoop in the T pipe connector, like the picture on the right.


換気扇の真下とかべたつかね?
ある程度べたつきます。スペースがあるなら、換気扇の下は避けることをお勧めします。(^_^;)
マグネットナイフラックはどのようにしてポールに取り付けているのですか?
教えいただけると嬉しいです!
ナイフラックのベースプレートと、ポールの間に付属のスペーサーを挟んでビニールテープでぐるぐる巻に固定しています。あんまりしっかりと固定できないのでもっと良い方法があるかもしれません!
初めまして。こちらの棚を作りたいのですが、この仕様の突っ張り棒が見つかりません。お忙しいところ申し訳ありませんが、まれまるさんがお使いになった突っ張り棒のメーカーと型番を教えてください。よろしくお願いします。
平安伸銅工業というメーカーのもので、楽天で以前に売っていたのですが、数年前から売っているところがなく、生産中止になっている可能性があります。近日、縦の突っ張り棒を2×4で作り直してコンテンツを再アップしようかと思っていますので、参考にしていただければうれしいです!
早速のご返答ありがとうございます。実は、ニトリのスティール製突っ張り棒(740円)を購入してみたところ、いけそうな気もしたのですが、やっぱり鉄なので耐久性とサビが心配なので悩んでいたところでした。なので、2×4の突っ張り棒すんごく楽しみです!!!余談ですが先月イケアに行って棚とバスケットとか細々としたものを1万円分くらい買ってしまったので、後戻りができんのです!(レシート廃棄済)というわけでよろしくお願いいたします。
参考にさせていただいています。
ウォールシェルフを購入したところ、サドルバンドでの固定時につかう穴は上下にひとつずつだったのですが、穴を増やしているのですか?
3年前の記事へのリプライで恐れ入りますが、ご回答いただけると幸いです。
はい、穴は追加で開けています。ステンレス用のドリルビットとインパクトドライバーで開けました。参考になれば幸いです!
お久しぶりです。ラブリコを使った新作を拝見いたしました。とても素晴らしいです!早速部品を購入して組み立てたいと思うのですが、何分DIY初心者で3点ほど教えて頂きたいことがあるので、厚かましいのですがヨロシクお願いします。
①ステンパイプとサドルバンドの規格は表の通り。
②サドルバンドを止めるボルトの径を教えてください。
③”337様”が質問されている、追加の穴を開ける時のコツを教えて下さい。ドリルは去年マキタのHP330Dというのを購入しました。回転数は、1500minです。(良くわかりませんがww)ステンレスなので私でもすんなりと開けられるのかなと心配です。
以上です。蛇足ですが、今月は、2700円のワークベンチも購入しました。道具を揃えて終わりにならない様にしなくちゃねっ!お返事楽しみにしてますです。
リメイク動画、お待たせいたしました!コメントもまたくださりありがとうございます。
ご質問の件です、
①ステンパイプとサドルバンドの規格は表の通り。→はい変更ありません。サドルバンドは緩めなサイズなので、スポンジやゴムを差し込んで調整が必要かと思います。
②サドルバンドを止めるボルトの径を教えてください。→M4です。
③”337様”が質問されている、追加の穴を開ける時のコツを教えて下さい。→ステンレス用のドリルを使うことと、回転数は1500に近いくらいで、とにかくまっすぐ荷重をかける(ある程度ぐっと体重をかけるくらい)ことくらいでしょうか?回しているだけで刃が進んでいかない状態だと、熱を持ってしまい、材料もドリルも悪くなるので、できれば数十秒くらいで。素人なので、参考程度ですが。
上手くいくといいですね、頑張ってください!
お世話になります。丁寧なご返答を頂いていたのにちょっと間が空いてしまいすんません(ww)。早速まれまる様のアドバイスを参考に、気合を入れてチャレンジしちゃおうかなと思います。何事もやってみなくっちゃ始まらないよね!
初めての一人暮らしなのですが、キッチンがとても古いタイプで水道管?みたいなものが壁づたいに伸びており突っ張り棒が壁ぴったりに設置できません…このような場合は諦めるしかないのでしょうか?
返信遅くなってすみません、柱が干渉するようであれば、柱の位置を手前にすることで、棚は壁にピッタリする方法はあると思います。Youtubeにアップしているやり方のように2×4材を使い、下記のリンクのような金具を使うと位置が調整できるかもしれません。(火に近すぎないように注意が必要ですが)
https://www.monotaro.com/g/00530246/